Author Topic: Phils 4thirty build  (Read 224136 times)

Lord Beany

  • Hero Member
  • *****
  • Posts: 2057
  • Karma: +2/-0
    • View Profile
Re: Phils 4thirty build
« Reply #105 on: December 17, 2012, 08:45:37 PM »
Front wheel fitted, using Bolts. I bought 26mm bolts (All fixed 60degree taper, by the way. 17mm socket.) I

That's from my build thread mate, I'm sure thread size is in there somewhere, but can't find it at moment.

Beany  ;D

DNA AUTOMOTIVE

  • Hero Member
  • *****
  • Posts: 987
  • Karma: +0/-0
  • The main dude's
    • View Profile
    • www.dnaautomotive.com
Re: Phils 4thirty build
« Reply #106 on: December 18, 2012, 08:37:54 PM »

Phils99

  • Hero Member
  • *****
  • Posts: 985
  • Karma: +2/-0
  • If I build it, it will work!
    • View Profile
Re: Phils 4thirty build
« Reply #107 on: December 18, 2012, 10:21:29 PM »
cheers roland and brian, have a great xmas yourselves and a very good new year...looking forward to watching dn8 build threads in 2013.....
What colour should a Ferrari be?...ROSSO of course!

Phils99

  • Hero Member
  • *****
  • Posts: 985
  • Karma: +2/-0
  • If I build it, it will work!
    • View Profile
Re: Phils 4thirty build
« Reply #108 on: January 03, 2013, 05:21:39 PM »
Very slow progress at the moment...we are packing like mad for the move up to Durham....we have the dates now 31st Jan and 1st Feb, I will then become a geordie!!
Not getting much time on the car, my main goal is to get the door panels screwed on and then lay the back end on so that I can car trailer the car to Durham.

Here is my piece of bar with the twist added!


Here I have drilled the holes in the door handle so that I can bolt the bar to it


I then marked the door for the cut-outs...the door will need a bit of work on the edge!


Drilled holes in the corners and then used my air saw to join up the holes...Ive left these rough at the moment as I will clean them up later


I then did the same on the other side...


After screwing the doors on, I then just laid some other panels on to see what it looks like...I also took the car off the jacks, and its now VERY low to the floor!!


Thats it for now....the next update will be me shipping it up to Durham as I wont get any more time on it between now and then....sorry for the slow build!

« Last Edit: January 03, 2013, 05:23:13 PM by Phils99 »
What colour should a Ferrari be?...ROSSO of course!

rudycob1

  • Hero Member
  • *****
  • Posts: 1079
  • Karma: +4/-1
    • View Profile
Re: Phils 4thirty build
« Reply #109 on: January 03, 2013, 05:46:26 PM »
Nice work Phil.
You will get there in the end and it will be worth it.
I'm working on it like crazy as I have a target of first week in Feb for body shop.
Keep us updated and good luck with your move.
Hopefully I will see you at the shows.
Take care

howza

  • Full Member
  • ***
  • Posts: 130
  • Karma: +0/-0
    • View Profile
Re: Phils 4thirty build
« Reply #110 on: January 03, 2013, 05:57:10 PM »
Hi Phil, nice work on the car. You will need to be a bit further north to become a true Geordie. When you get moved in, if you get stuck on anything just let me know as I'am just north of Newcastle. Sold my 430 mind and now sorting a DN8 but did the full build including roof install ( with help from Madman) . Happy to help as all on here are. Best regards and welcome to the northeast. Howza

Phils99

  • Hero Member
  • *****
  • Posts: 985
  • Karma: +2/-0
  • If I build it, it will work!
    • View Profile
Re: Phils 4thirty build
« Reply #111 on: March 18, 2013, 09:01:25 PM »
REPOSTING THIS AS I PUT IT IN THE WRONG THREAD!!

IM BACK!!

We have now moved in and I have spent the last 5 weekends doing "man" jobs around the new house.

These are now mostly done, so I decided to have a day on the car to get a bit done!
Im so far behind now, but anyway its an hobby not a rush job!

I think I am aiming for next spring for it to be ready now......

Anyway, I removed the panels that I had quickly bolted on so that I could transport the car up to Durham so that I could carry on where I left off.....

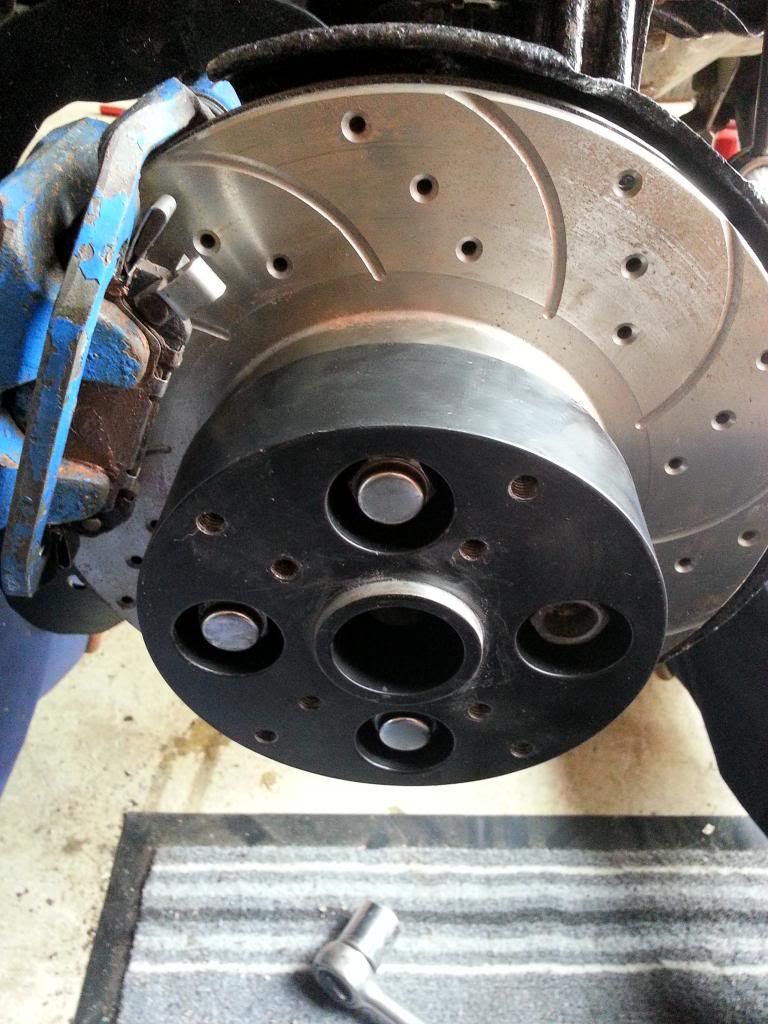
So I decided to fit the kits wheels, starting with the back ones....here Im splitting the supplied rear spacers..


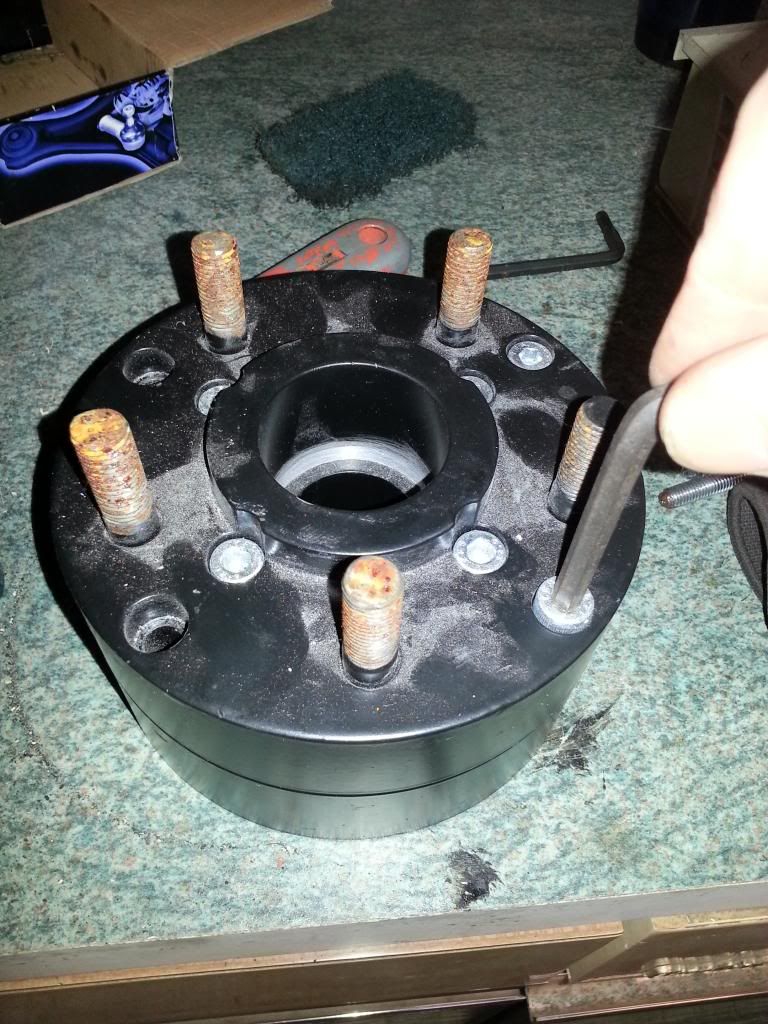
here is the inner part of the spacer, you secure this to the existing wheel threads using the shorter wheels nuts.


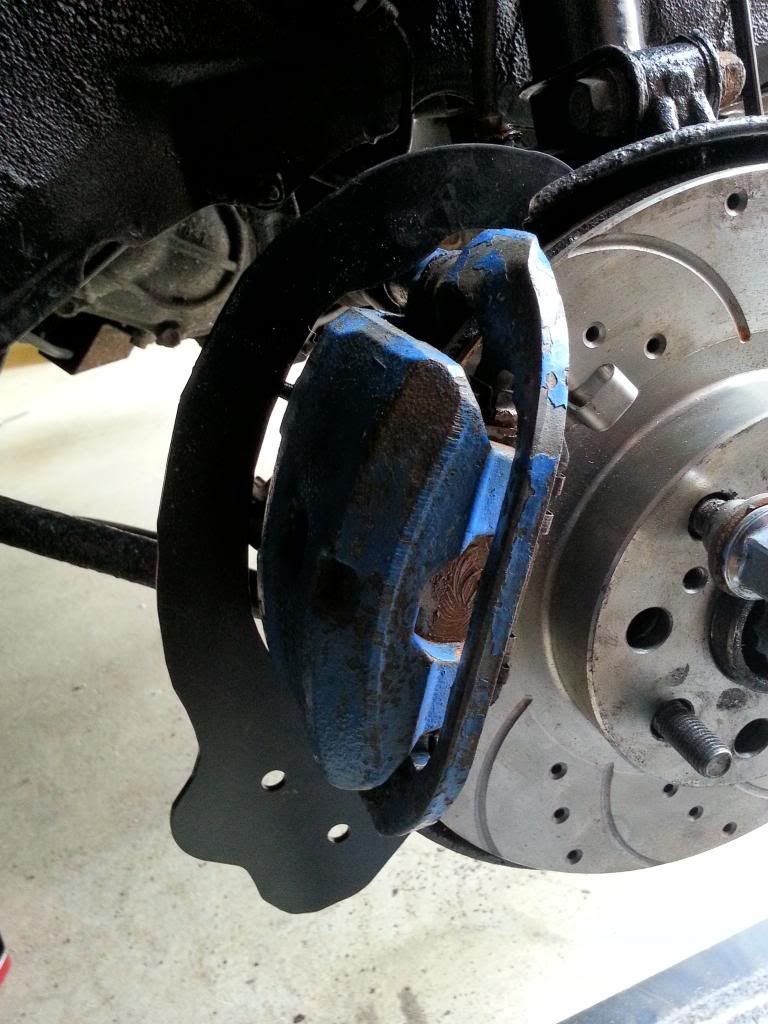
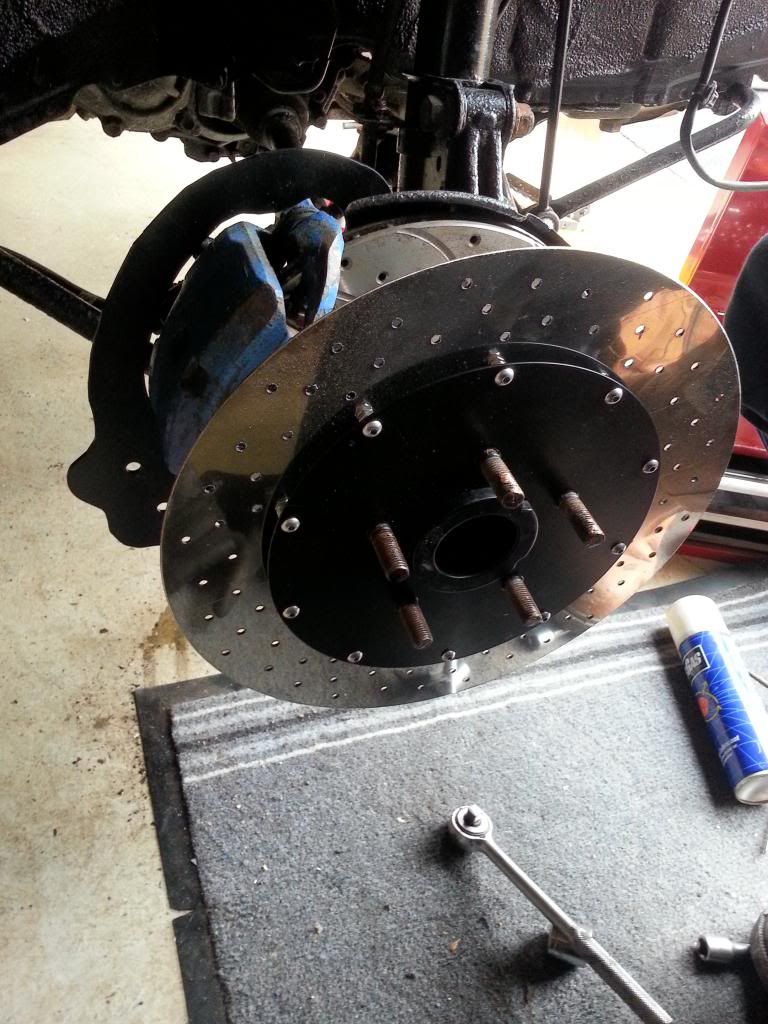
here is the plate for the fake caliper mounted


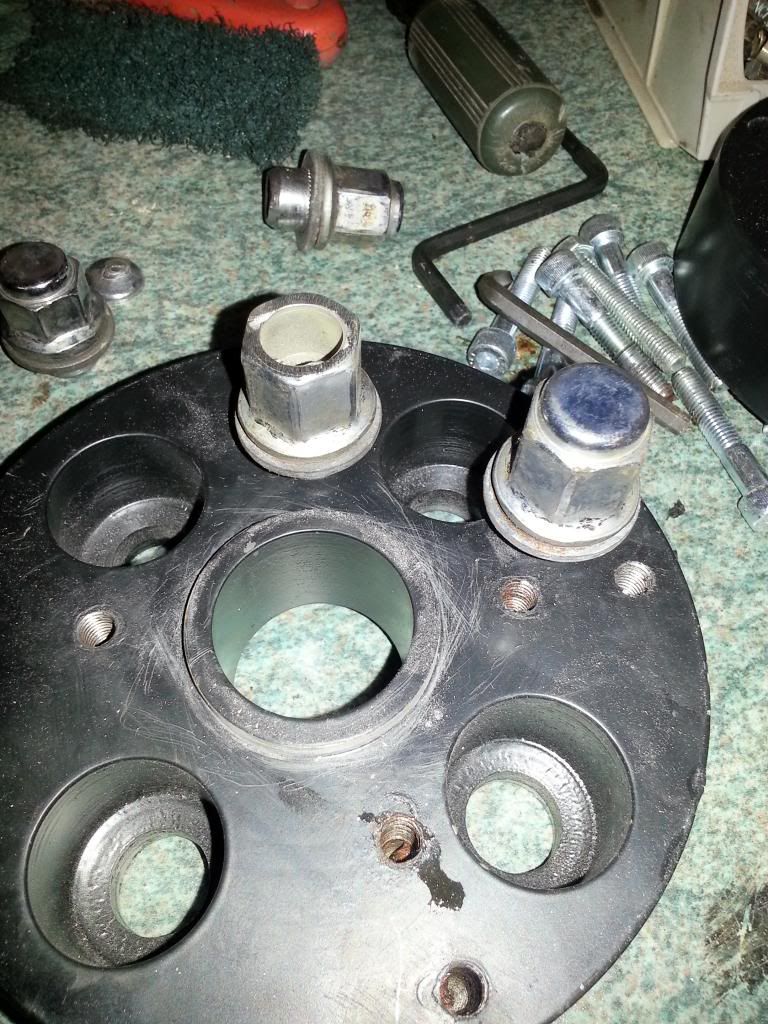
Here is the inner spacer fitted


The outer spacer is them allen bolted back onto the inner spacer and the fake disk then fits it between the spacer and the wheel.


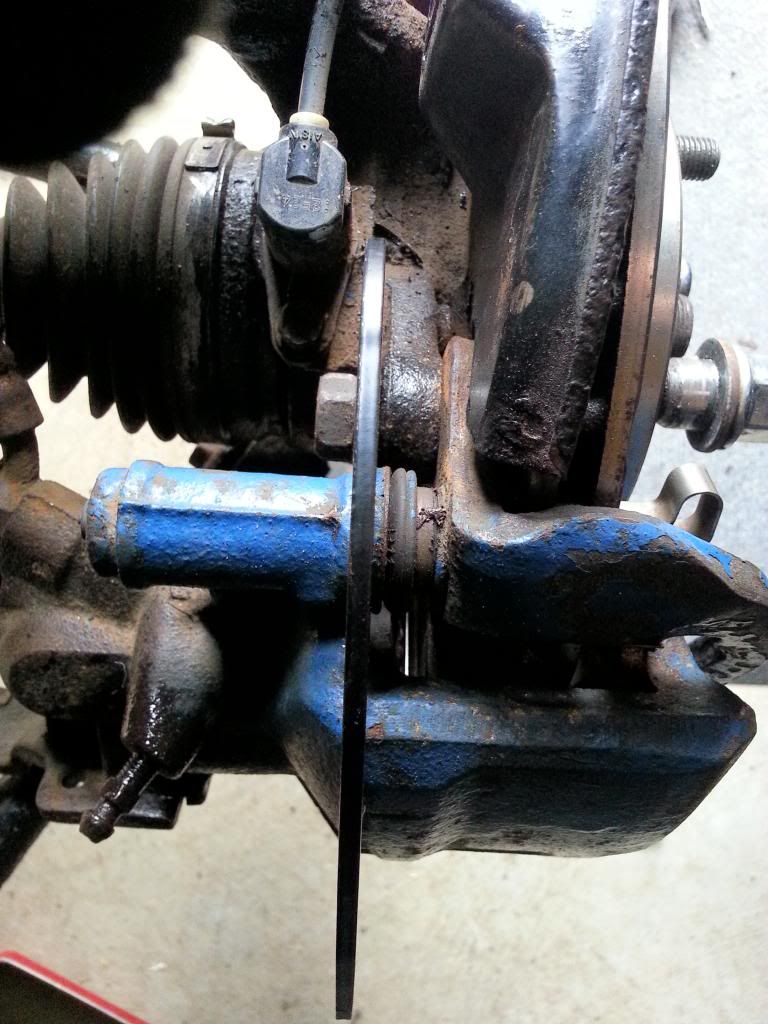
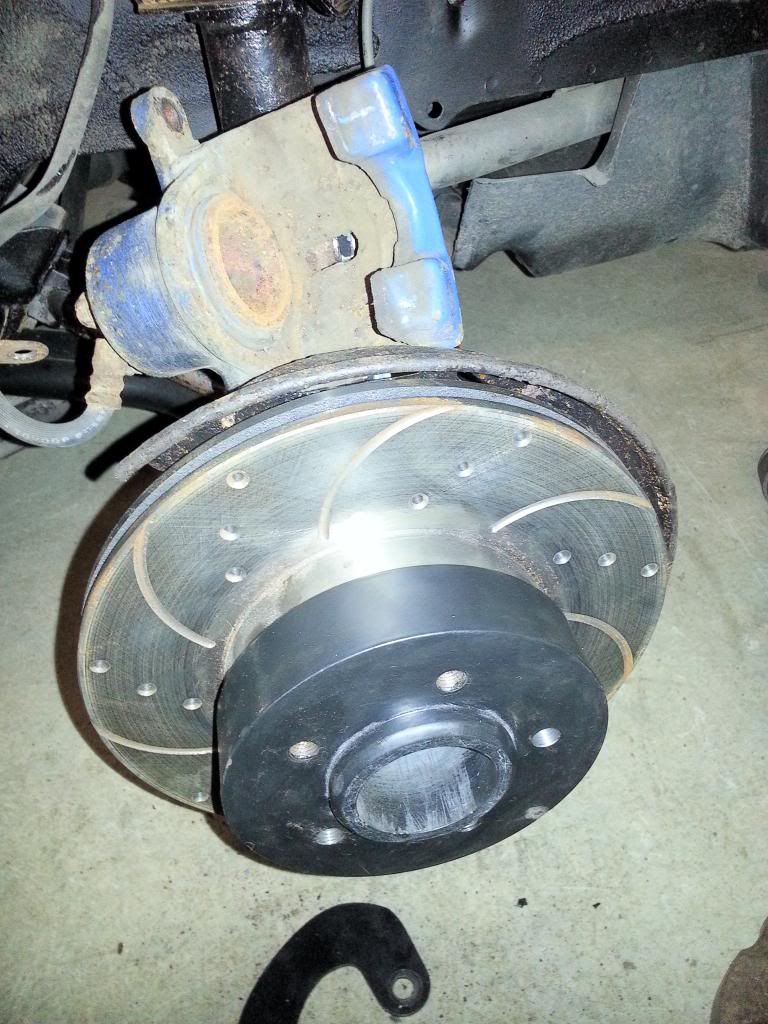
here is the front one fitted.....this needs the existing bolts removing and the new bolts inserting from the rear.


thats it for now....be a couple of weeks before I get any more time on the baby....
What colour should a Ferrari be?...ROSSO of course!

beemaman

  • Hero Member
  • *****
  • Posts: 2029
  • Karma: +7/-1
  • theres only one way to build
    • View Profile
Re: Phils 4thirty build
« Reply #112 on: March 19, 2013, 11:40:33 AM »
good to see you back buddy and hope you can get the time on her now your all sorted..

keep the updates coming buddy :) :)

Phils99

  • Hero Member
  • *****
  • Posts: 985
  • Karma: +2/-0
  • If I build it, it will work!
    • View Profile
Re: Phils 4thirty build
« Reply #113 on: April 05, 2013, 11:43:50 AM »
managed to get a little more time on her...decided to have a go at the petrol pipes...

You need to release this bracket as it holds the main filler pipe and the breather pipe..


A similar bracket is underneath the car that holds the breather steady..didnt get any pics of this..

After removing the filler and pipes, I cut a length off the breather to use to help me attach the new supplied pipe with:


Which I then connected to my new pipe:


I then took a piece of rubber tubing I had a rivited it around the hole to stop the pipes scraping on the metal:


The two pipes were then positioned until I was happy and pushed through the hole ready for the kit!


So thats another ticked off my very long list of jobs to do!

another update very soon
What colour should a Ferrari be?...ROSSO of course!

beemaman

  • Hero Member
  • *****
  • Posts: 2029
  • Karma: +7/-1
  • theres only one way to build
    • View Profile
Re: Phils 4thirty build
« Reply #114 on: April 05, 2013, 12:41:08 PM »
good work phills these are the fiddly parts :) :)

keep them coming...

rudycob1

  • Hero Member
  • *****
  • Posts: 1079
  • Karma: +4/-1
    • View Profile
Re: Phils 4thirty build
« Reply #115 on: April 05, 2013, 12:48:20 PM »
Glad to see you back working on it.
 :)

Phils99

  • Hero Member
  • *****
  • Posts: 985
  • Karma: +2/-0
  • If I build it, it will work!
    • View Profile
Re: Phils 4thirty build
« Reply #116 on: April 05, 2013, 01:43:49 PM »
Cheers for the comments guys!

More updates for you......

Decided to drag the back end off the car and onto the drive to have a go at cutting out the holes.

started hacking at the the rear grill area....essential tool of the trade an air saw...just wish I had a bigger compressor...I get about 1-2 inches along and it runs out! took ages to cut this out!


Another essential tool the black and decker power file!!


rear grill area cut out....


Next to go was the fuel filler cap area.....


and then the tail lights....these took ages as the shape is not clearly defined on where you should cut out, so it was a case of cut and trial fit the lights until they fit nicely, this left them looking like this:


I then only managed to do the lower air intake as I ran out of time!


more soon!!
What colour should a Ferrari be?...ROSSO of course!

NYAL F430

  • Full Member
  • ***
  • Posts: 128
  • Karma: +2/-0
    • View Profile
Re: Phils 4thirty build
« Reply #117 on: April 05, 2013, 05:45:48 PM »
hi phil, great to see you back, build looks like its coming along nicely, nice job cutting out the vents, how easy is it to cut out the vents along the bottom, need to make a start on mine soon.

thanks nyal


Phils99

  • Hero Member
  • *****
  • Posts: 985
  • Karma: +2/-0
  • If I build it, it will work!
    • View Profile
Re: Phils 4thirty build
« Reply #118 on: April 05, 2013, 07:26:14 PM »
the lower and upper air intake vents are both "back trim" that is to say all you need to do is get yourself a black and decker power file (£40 from B&Q) and just let it do it magic until you "see light" through the fibreglass. Here is a pic from inside of the lower vent you should be able to see that its been filed down and not cut out!

What colour should a Ferrari be?...ROSSO of course!

MADMAN

  • Hero Member
  • *****
  • Posts: 2852
  • Karma: +6/-4
    • View Profile
Re: Phils 4thirty build
« Reply #119 on: April 05, 2013, 10:30:43 PM »
managed to get a little more time on her...decided to have a go at the petrol pipes...

You need to release this bracket as it holds the main filler pipe and the breather pipe..


A similar bracket is underneath the car that holds the breather steady..didnt get any pics of this..

After removing the filler and pipes, I cut a length off the breather to use to help me attach the new supplied pipe with:


Which I then connected to my new pipe:


I then took a piece of rubber tubing I had a rivited it around the hole to stop the pipes scraping on the metal:


The two pipes were then positioned until I was happy and pushed through the hole ready for the kit!


So thats another ticked off my very long list of jobs to do!

another update very soon
Things to do, buy a bigger compressor ;D, 14cfm about the biggest single fase will run happy I think, (anyone know any different) also I fit an earth wire to petrol filler neck, dont know if it needs it, thought it would be safer. keep up the good work Phill
MADMAN 8)